C# Programming

ImageMaking "Click Once / 3D CPU Meter"

開発環境: Visual Studio 2005 

1.Index

  1. Index
  2. Introduction
  3. References
  4. Making 3D picture
  5. Implementing CPUMeterPanel
  6. Implementing the Main Form
  7. Publish the 3D CPU Meter

2.Introduction

Please take a look at following screen shot! It looks like 3D application using Direct X technology, but it's GDI+ based normal Windows.Forms application with 3D like background picture!  Some of you might be interested in 3D application. This article describes how to create 3D "Like" 2D application.

Image

Just click the following URL to launch the 3D CPU Meter.

Click Once / 3D CPU Meter


3.References

  1. Blender.org
  2. Blender Documentation
  3. Blender Documentation Japanese/日本語版

4.Making 3D picture

Before you jump into this, please note "3D Modeling is really time consuming"!! It took almost two weeks for me to create the CPU Meter background image! If you don't have enough time, I'd strongly recommend you to stay out of the 3D modeling!!

Ok, now you are pretty sure to go one step forward:-)

There are many 3D modeling software, but most of them are pretty expensive. If you have tons of money, buy what ever you want and take a training course. But, fortunately, there is greate free 3D modeling software, "Blender". I used "Blender" to make this application, but "Blender" is designed as multi-platform software, and it has very unique GUI and operations. If you know someone who is familiar with "Blender", please do not hesitate to ask him how to use "Blender"! It's so unusual!

  1. Go to Blender.Org and install the latest Blender.
  2. Go to Blender Documentation and read the manual!
  3. Enjoy 3D modeling with Blender.

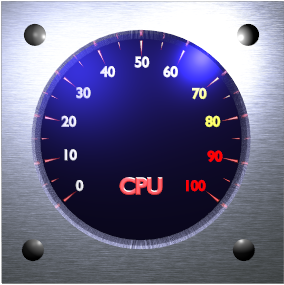
Now I'm assuming that you can create following 3D image with Blender.

Download 3DCPUBlender Data
3DCPUMeter.blend

When you download "3DCPUMeter.blend" and double click, following "Blender" will come up.

Image

Now, press F12 key to render current frame. Then, following Render image will be created.

Image

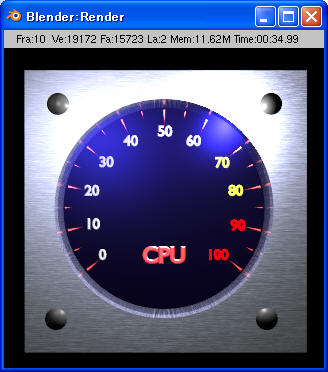
Press F3 key to save image as "3DCPU.png".
Please trim black background and save.

Now, finally you can get following background image!

Image

5.Implementing CPUMeterPanel

Now it's time to implement CPU Meter.  There are two steps. First, we create a CPUMeterPanel control class derived from "PictureBox" control.

You don't want the CPU meter heavy enough to consume your CPU power. That's why I'm making the CPUMeterPanel control class derived from the PictureBox control. Because the PictureBox control has double buffering capability and it's very efficient to draw graphics. Also it can handle images easily.

  1. Create a new C# Windows Forms project.
  2. Add new project as "CPUMeterPanel".
  3. Delete form1.cs in the project.
  4. Add new class as "CPUMeterPanel.cs" to the "CPUMeterPanel" project.
  5. Copy and paste following code.
    If you are familiar with C# and GDI+ and "Inheritance", it's easy to understand the code.
    Acknowledgements
    Please note that the concept of this code comes from Mr. Kawabata, who is the leader of the INETA Japan. All thanks should go to Mr.Kawabata!!


    CPUMeterPanel.cs
    using System;
    using System.Drawing;
    using System.Drawing.Drawing2D;
    using System.ComponentModel;
     
    namespace Uchukamen.CPUMeter
    {
    	/// 
    	/// 
    	public class CPUMeterPanel: System.Windows.Forms.PictureBox
    	{
    		private System.ComponentModel.IContainer components = null;
    
    		public CPUMeterPanel()
    		{
    			// 
    			//
    			InitializeComponent();
    
    			// Initialize Brush and Image
    			handBrush = new SolidBrush(handColor);
    			LoadImage();
    		}
    
    		/// 
    		/// 
    		protected override void Dispose( bool disposing )
    		{
    			if( disposing )
    			{
    				if (components != null) 
    				{
    					components.Dispose();
    				}
    			}
    			base.Dispose( disposing );
    		}
    
    		#region Windows 
    		/// 
    		/// 
    		private void InitializeComponent()
    		{
    			this.performanceCounter1 = new System.Diagnostics.PerformanceCounter();
    			this.folderBrowserDialog1 = new System.Windows.Forms.FolderBrowserDialog();
    			((System.ComponentModel.ISupportInitialize)(this.performanceCounter1)).BeginInit();
    			// 
    			// performanceCounter1
    			// 
    			this.performanceCounter1.CategoryName = "Processor";
    			this.performanceCounter1.CounterName = "% Processor Time";
    			this.performanceCounter1.InstanceName = "_Total";
    			// 
    			// CPUMeterPanel
    			// 
    			this.Resize += new System.EventHandler(this.CPUMeterPanel_Resize);
    			((System.ComponentModel.ISupportInitialize)(this.performanceCounter1)).EndInit();
    
    		}
    		#endregion
    
    		#region Properties
    		private Color handColor = Color.White;
    		[Category( "Meter" )]
    		[Description( "Hand Color" )]
    		[DefaultValue( typeof(Color), "White" )]
    		public Color HandColor
    		{
    			get {return this.handColor;}
    			set 
    			{
    				handColor = value;
    				handBrush = new SolidBrush(value);
    				Refresh();
    			}
    		}
    
    		private double startAngle = -125.0;
    		[Category( "Meter" )]
    		[Description( "Start Angle" )]
    		[DefaultValue( typeof(double), "-125.0" )]
    		public double StartAngle
    		{
    			get {return startAngle;}
    			set 
    			{
    				startAngle = value;
    				Refresh();
    			}
    		}
    
    		private double endAngle = 125.0F;
    		[Category( "Meter" )]
    		[Description( "End Angle" )]
    		[DefaultValue( typeof(double), "125.0" )]
    		public double EndAngle
    		{
    			get {return endAngle;}
    			set 
    			{
    				endAngle = value;
    				Refresh();
    			}
    		}
    
    		private Bitmap originalBitmap = null;
    		private System.Diagnostics.PerformanceCounter performanceCounter1;
    	
    		[Category( "Meter" )]
    		[Description( "Background Bitmap" )]
    		[DefaultValue( typeof(Bitmap), "" )]
    		public Bitmap OriginalBitmap
    		{
    			get {return originalBitmap;}
    			set 
    			{
    				originalBitmap = value;
    				LoadImage();
    			}
    		}
    
    		#endregion
    
     
    		private const double pai = Math.PI;
    		private SolidBrush handBrush;
    
    		/// 
    		private int r;     // Meter Radius
    
    		private GraphicsPath handPath;
    		private System.Windows.Forms.FolderBrowserDialog folderBrowserDialog1;
    
    		// Current Meter Value
    		static float meterRead = 0.0F;
    		/// 
    		/// Draw Hand
    		/// 
    		/// 
    		/// 
    		public void drawHand(Graphics g, float currentSpeed)
    		{			
    			double totalAngle = endAngle - startAngle;
    
    			// Delta = Current Value - Current Meter Read
    			// Get the current meter closer to the current value with delta/10 step.
    			float delta = currentSpeed - meterRead;
    			float step = delta/10F;
    			meterRead += step;
    			GraphicsState gs = g.Save();
    			// Rotate and draw the meter hand.
    			g.RotateTransform((float)(startAngle + meterRead * totalAngle/100F));
    			if (handPath != null)
    				g.FillPath(handBrush, handPath);
    			g.Restore(gs);
    		}
    		
    		/// 
    		/// Re calculate size related values
    		/// 
    		public void Recalculate(int width, int height)
    		{			
    			// Radius
    			r = (int)(0.6 * Math.Min(width/2, height/2));
    
    			// Graphics Path of the meter hand
    			int handWidth = (int)(Math.Max(1.0F, r*0.02F));
    			handPath = new GraphicsPath();
    			Point [] p = new Point[5];
    			p[0] = new Point((int)(-r*0.1F), 0);
    			p[1] = new Point(0, -handWidth);
    			p[2] = new Point(r, 0);
    			p[3] = new Point(0, handWidth);
    			p[4] = new Point((int)(-r*0.1F), 0);
    			handPath.AddLines(p);
    			handPath.CloseAllFigures();
    		}
    
    		public void LoadImage()
    		{
    			if (OriginalBitmap == null)
    				return;
    			if (Width <= 0 || Height <= 0)
    				return;
    			if (BackgroundImage != null)
    				BackgroundImage.Dispose();
    			BackgroundImage = new Bitmap(OriginalBitmap, Width, Height);
    		}
    		
    		protected override void OnPaint(System.Windows.Forms.PaintEventArgs e)
    		{
    			float val = performanceCounter1.NextValue();
    			Graphics g = e.Graphics;
    			g.TranslateTransform(Width/2, Height/2);
    			g.RotateTransform(-90.0F);
    			g.SmoothingMode = SmoothingMode.AntiAlias;
    			drawHand(g, val);
    		}
    		
    		private void CPUMeterPanel_Resize(object sender, System.EventArgs e)
    		{	
    			Recalculate(Width, Height);
    			LoadImage();
    		}
    	}
    }
  6. Now build the solution.
  7. Go to the ToolBox and right click to select customize ToolBox. Then, following dialog will come up. Add compiled CPUMeterPanel.dll to the ToolBox.
    Image
  8. Now you will see the CPUMeterPanel control on the ToolBox as follows.
    Image

6.Implementing the Main Form

  1. Drag and Drop the CPUMeterPanel control to the Main Form.
    You will see some properties for the CPUMeterPanel in the property window.
    Please set the 3D image created by Blender to the OriginalBitmap.
    Also set Dock property as FULL, then your Visual Designer will be like this.
    Image

  2. Drag and Drop the Timer Control to the Main Form to update the CPUMeterPanel.
  3. You have to implement some event handlers to handle timer event.
    Double click the main form and add Form1_Load event to start the timer.
    Add Form_Load event handler
    private void Form1_Load(object sender, System.EventArgs e)
    {
    	this.timer1.Enabled = true;
    }


  4. To update CPU Meter, you need refresh the CPUMeterPanel. Please add following event handler for the timer control. The timer interval would be 100ms-500ms for smooth move.
    Add Timer Tick event handler.
    private void timer1_Tick(object sender, System.EventArgs e)
    {
    	this.Refresh();
    }


  5. Also when you resize the window, the CPUMeterPanel has to be recalculated to fit the window size. Please add following resize event handler to refresh.

    Add Form_Resize event handler.
    private void Form1_Resize(object sender, System.EventArgs e)
    {
    	if(this.WindowState != FormWindowState.Minimized) 
    		this.Refresh();
    }


  6. Now rebuild all and run! And you can add MainMenu or whatever you need!
    Image

7.Publish the 3D CPU Meter

To publish the 3D CPU Meter, from Menu->Build->Publish 3D CPU Meter. Then Publish Wizard will come up. Please specify the application server to which the application to be uploaded. The application server should support ASP.NET 2.0.

Image

The wizard will ask you to select "use online only" or "use offline".

Image

Right after you publish the software, following page will come up.

Image

And just press install to launch the software. But, as I have not signed the software, following security warning will be displayed. Press install if you can trust me :-)

Image

Please note that .NET Framework 2.0 will be required on the client side. If you don't have .NET Framework 2.0 installed on the client, following setup helper dialog will come up.

Image

Now, you will see the 3D CPU Meter.

Image