C#
Parallel.For
+ Native C による高速化〜その3:並列画像処理
準備ができたところで、C# と C# + Native Cでの画像処理でどのぐらい差が出るのか試してみます。
対象は、1つの画像に対して、ラプラシアンフィルターを適用するという、簡単な画像処理です。ラプラシアンフィルタとは空間2次微分を計算し、輪郭を検出するフィルタです。
ここでは、次のような 3x3 の8近傍フィルターを使います。
画像の取得と表示部分
画像の取得と表示部分は、C# の得意とする部分なので、特に困ることはないと思います。
WPFで、次のような画面をデザインします。
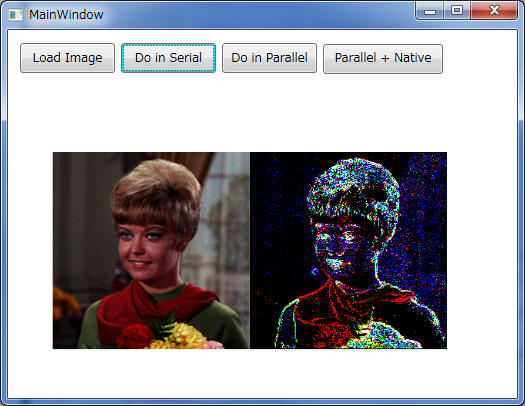
<Window x:Class="WritableBitmap.MainWindow"
xmlns="http://schemas.microsoft.com/winfx/2006/xaml/presentation"
xmlns:x="http://schemas.microsoft.com/winfx/2006/xaml"
Title="MainWindow" Height="406" Width="525">
<Grid>
<Viewbox Margin="0,57,0,0">
<StackPanel Orientation="Horizontal"
Margin="58,79,91,58">
<Viewbox >
<Image x:Name="SourceImage"
VerticalAlignment="Stretch"
HorizontalAlignment="Stretch"
Stretch="UniformToFill" />
</Viewbox>
<Viewbox >
<Image x:Name="ResultImage"
VerticalAlignment="Stretch"
HorizontalAlignment="Stretch"
Stretch="UniformToFill" />
</Viewbox>
</StackPanel>
</Viewbox>
<Button Content="Load Image" Height="30"
HorizontalAlignment="Left" Margin="12,13,0,0"
Name="buttonLoadImage" VerticalAlignment="Top"
Width="95" Click="buttonLoadImage_Click" />
<Button Content="Do in Serial" Height="30"
HorizontalAlignment="Left" Margin="113,13,0,0"
Name="button2" VerticalAlignment="Top" Width="95"
Click="buttonExecInSerial_Click" />
<Button Content="Do in Parallel" Height="30"
HorizontalAlignment="Left" Margin="214,13,0,0"
Name="button3" VerticalAlignment="Top" Width="95"
Click="buttonExecInParallel_Click" />
<Button Content="Do in Parallel" Height="30"
HorizontalAlignment="Left" Margin="580,110,0,0"
Name="button4" VerticalAlignment="Top" Width="95"
Click="button4_Click" />
<Button Content="Parallel + Native" Height="30"
Margin="315,13,74,324" Name="buttonParallelNative"
Click="buttonParallelNative_Click" />
</Grid>
</Window>
 画像のロード
Bitmap.GetPixel 、SetPixel
メソッドだと、1画素1画素処理をするため、とても遅くなってしまいます。そこで、WriteableBitmap
を使用します。
画像のロードは例えば次のようになります。
WriteableBitmap srcWritableBitmap;
private void buttonLoadImage_Click(object
sender, RoutedEventArgs e)
{
OnFileOpen();
}
void OnFileOpen()
{
OpenFileDialog dlg = new OpenFileDialog();
dlg.Filter = "Bitmap
files|*.bmp;*.png;*.jpeg;*.jpg;*.gif;*.tiff;*.tif;*.wdp|"
+
"BMP files (*.bmp)|*.bmp|" +
"PNG files (*.png)|*.png|" +
"JPEG files (*.jpeg, *.jpg)|*.jpeg;*.jpg|" +
"GIF files (*.gif)|*.gif|" +
"TIFF files (*.tiff, *.tif)|*.tiff;*.tif|" +
"Windows Media Player files (*.wdp)|*.wdp|" +
"All files (*.*)|*.*";
if ((bool)dlg.ShowDialog())
{
SourceImage.Source = null;
srcWritableBitmap = null;
BitmapFrame frame = null;
try
{
frame =
BitmapFrame.Create(new Uri(dlg.FileName),
BitmapCreateOptions.None,
BitmapCacheOption.None);
}
catch (Exception exc)
{
MessageBox.Show(exc.Message, Title);
return;
}
srcWritableBitmap = new
WriteableBitmap(frame);
if
(srcWritableBitmap.Format.BitsPerPixel != 8 &&
srcWritableBitmap.Format.BitsPerPixel != 24 &&
srcWritableBitmap.Format.BitsPerPixel != 32)
{
MessageBox.Show("Bitmap must have 8 or 24 bits or 32
bits per pixel", Title);
srcWritableBitmap = null;
return;
}
SourceImage.Source =
srcWritableBitmap;
}
}
C#による逐次実行処理の実装
まずは、C#によるシーケンシャル(逐次)実行処理を比較データ用に実装します。
private void
buttonExecInSerial_Click(object sender,
RoutedEventArgs e)
{
Filter filter = new Filter();
filter.SetParameters(
srcWritableBitmap.PixelWidth,
srcWritableBitmap.PixelHeight,
srcWritableBitmap.Format.BitsPerPixel
/ 8);
srcWritableBitmap.CopyPixels(filter.Source, GetStride(), 0);
filter.ExecuteInSerial();
WriteableBitmap resWritableBitmap =
srcWritableBitmap.Clone();
ResultImage.Source = resWritableBitmap;
resWritableBitmap.WritePixels(filter.Rect, filter.Result,
filter.Stride, 0);
}
ここでは、Filter
クラスを実装します。このフィルタークラスに画像をコピーして、フィルターが画像処理を行います。このとき、次のように画像をfor
ループで処理していきます。ここでは、フィルターのロジック通りシンプルに for
ループを回しているので、5重の for ループになっています。
for (int y...)....縦方向
for(int x...)...横方向
for(int col)...色方向
for(int yy...)...フィルター縦方向
for(int
xx...)...フィルター横方向
namespace WritableBitmap
{
class Filter
{
float[,] filter = {
{ -1 / 8f, -1
/ 8f, -1 / 8f },
{ -1 / 8f, 8
/ 8f, -1 / 8f },
{ -1 / 8f, -1
/ 8f, -1 / 8f }
};
中略
public byte[] Source { get; set; }
public byte[] Result { get; set; }
public void SetParameters(int width,
int height, int bytesPerPixel)
{
Width =
width;
Height =
height;
BytesPerPixel
= bytesPerPixel;
Rect = new
Int32Rect(0, 0, Width, Height);
Stride =
Width * BytesPerPixel;
Source = new
byte[Width * BytesPerPixel * Height];
Result = new
byte[Width * BytesPerPixel * Height];
}
public void ExecuteInSerial()
{
for (int y =
1; y < Height - 1; y++)
FilterOneLine(y);
}
private void FilterOneLine(int y)
{
int str =
Width * BytesPerPixel;
for (int x =
1; x < Width - 1; x += 1)
{
// 各色ごとに
for (int col = 0; col < BytesPerPixel; col++)
{
int index = str * y + BytesPerPixel * x + col;
if (col == 3)
{
Result[index] = 255;
continue;
}
float v = 0f;
for (int yy = -1; yy <= 1; yy++)
for (int xx = -1; xx <= 1; xx++)
{
int position = str * (y + yy) + BytesPerPixel *
(x + xx) + col;
float filterValue = filter[yy + 1, xx + 1];
v = v + Source[position] * filterValue;
}
v = Math.Abs(v);
v = (v > 10) ? 255 : 0;
Result[index] = (byte)v;
}
}
}
}
}
注意: このコードを見て気が付いたと思いますが、高速化の余地が多く残っています。1つ目が、for
ループの展開、2つ目が浮動小数点積和演算です。これらの処理により、並列化を行わなくても、かなりの高速化が可能です。しかし、ここでは並列化の効果を確認するために、素直にフィルターを実装したことを前提に比較処理を行います。
注意:
画像処理ライブラリーを作ることが目的ではないので、3x3固定です。またエラー処理は除いてあります。
C#による並列実行処理の実装
C# による並列実行を行うには、次のように Filter
クラスで、次のExecuteInParallelメソッドで並列実行部分を追加するだけです。
private void buttonExecInParallel_Click(object
sender, RoutedEventArgs e)
{
Filter filter = new Filter();
filter.SetParameters(
srcWritableBitmap.PixelWidth,
srcWritableBitmap.PixelHeight,
srcWritableBitmap.Format.BitsPerPixel
/ 8);
srcWritableBitmap.CopyPixels(filter.Source, GetStride(), 0);
filter.ExecuteInParallel();
WriteableBitmap resWritableBitmap =
srcWritableBitmap.Clone();
ResultImage.Source = resWritableBitmap;
resWritableBitmap.WritePixels(filter.Rect, filter.Result,
filter.Stride, 0);
}
public void ExecuteInParallel()
{
Parallel.For(1, Height - 1, FilterOneLine);
}
大きめの画像3072×2304 Color画像を、Core i7 860 の4Core
8Thread を使用して実行した結果は次の表1番となりました。
これより、Parallel.For により最外殻の For
ループを並列に実行するだけで、ロジックを変更することなく、約4倍の高速化ができていることがわかります。これは、4コアであることを考えると、十分な効果が出ていると言えます。
|
番号 |
説明 |
シリアル実行(秒) |
パラレル実行(秒) |
| 1 |
素直にフィルターを実装 |
4.7 |
1.1 |
| 2 |
フィルターの2重for ループを展開 |
3.0 |
0.8 |
| 3 |
float
による積和をint 加減算とシフトに変更 |
2.1 |
0.5 |
| 4 |
Color
のループを展開 |
1.6 |
0.4 |
なお、参考までに、フィルターの2重forループを展開した場合、さらに float による積和を int
加減算とシフトに変更した場合、さらに Color
のループを展開した場合についても、同様に測定してみました。いずれの場合もほぼ4倍のそり速度が出ています。
以上より、コードやロジックを工夫して約3倍の高速化ができたのに対し、単純に最外殻の for ループを
Parallel.For
に置き換えるだけで4倍の性能が出ていることを考えると、並列化の効果が高いことがよくわかります。また、この2つのアプローチの組み合わせでは、4.6秒が最終的に0,4秒まで高速化できており、C#のマネージドコードだけで10倍の性能を出すことができています。
C#
+ Native C による並列実行処理の実装
Cによる
フィルターの実装は次の通りです。これを見てもらえればわかりますが、C#の実装とほとんど変わりません。
#include "math.h"
#include "NativeFilter.h"
extern "C"
{
中略
unsigned char* Source;
unsigned char* Result;
__declspec(dllexport) void __stdcall SetParameters(int width,
int height, int bytesPerPixel)
{
中略
}
__declspec(dllexport) void __stdcall SetSource(char* src)
{
Source = src;
}
__declspec(dllexport) void __stdcall SetResult(char* res)
{
Result = res;
}
void FilterOneLine(int y)
{
int str = Width * BytesPerPixel;
for (int x = 1; x < Width - 1; x +=
1)
{
// 各色ごとに
for (int col
= 0; col < BytesPerPixel; col++)
{
int index = str * y + BytesPerPixel * x + col;
if (col == 3)
{
Result[index] = (char)255;
continue;
}
float v = 0.0;
for (int yy = -1; yy <= 1; yy++)
for (int xx = -1; xx <= 1; xx++)
{
int position = str * (y + yy) + BytesPerPixel * (x +
xx) + col;
float filterValue = filter[yy + 1][ xx + 1];
v = v + Source[position] * filterValue;
}
v = abs(v);
v =(float)((v > 10.0) ? 255.0 : 0.0);
Result[index] = (unsigned char)v;
}
}
}
}
一方、C#
の呼び出し側は、マネージドの画像データをアンマネージドの画像データとして相互に受け渡しが必要となるため、少し複雑になります。
[DllImport("NativeFilter.dll")]
static extern void SetParameters(int width, int
height, int bytesPerPixel);
[DllImport("NativeFilter.dll")]
static extern void SetSource(IntPtr s);
[DllImport("NativeFilter.dll")]
static extern void SetResult(IntPtr r);
[DllImport("NativeFilter.dll")]
static extern void ExecuteInParallelNative(int y);
private void buttonParallelNative_Click(object
sender, RoutedEventArgs e)
{
SetParameters(
srcWritableBitmap.PixelWidth,
srcWritableBitmap.PixelHeight,
srcWritableBitmap.Format.BitsPerPixel
/ 8);
int bytesPerPixel =
srcWritableBitmap.Format.BitsPerPixel / 8;
int stride =
srcWritableBitmap.PixelWidth * bytesPerPixel;
int len = stride *
srcWritableBitmap.PixelHeight;
int height =
srcWritableBitmap.PixelHeight;
Int32Rect rect = new Int32Rect(0, 0,
srcWritableBitmap.PixelWidth,
srcWritableBitmap.PixelHeight);
byte[] ManagedSource = new byte[len];
srcWritableBitmap.CopyPixels(ManagedSource, stride,
0);
IntPtr UnmanagedSource =
Marshal.AllocHGlobal(len);
IntPtr UnmanagedResult =
Marshal.AllocHGlobal(len);
Marshal.Copy(ManagedSource, 0,
UnmanagedSource, ManagedSource.Length);
SetSource(UnmanagedSource);
SetResult(UnmanagedResult);
WriteableBitmap resWritableBitmap =
srcWritableBitmap.Clone();
ResultImage.Source =
resWritableBitmap;
byte[] ManagedResult = new byte[len];
var syncObject = new object();
var res = Parallel.For(1,
(int)(height - 1), (y) =>
{
ExecuteInParallelNative(y);
});
Marshal.Copy(UnmanagedResult, ManagedResult, 0, len);
resWritableBitmap.WritePixels(rect, ManagedResult, stride,
0);
Marshal.FreeHGlobal(UnmanagedSource);
Marshal.FreeHGlobal(UnmanagedResult);
}
C#
Parallel.For + Native C による高速化効果
この C# Parallel.For + Native C による高速化効果を次の表に示します。
|
番号 |
説明 |
シリアル実行(秒) |
パラレル実行(秒) |
| 1 |
素直にフィルターを実装(C#) |
4.7 |
1.1 |
| 2 |
コード、ロジックレベルでの最適化実装(C#) |
1.6 |
0.4 |
| 3 |
C# + Native C 実行 |
0.2 |
0.1 |
注意:
以上の結果より、C# で素直にフィルターを実装た場合に比べて、C# Paralle.For +
Native C の組み合わせで、約50倍の高速化が実現できることを確認しました。
なお、SSE の効果ですが、実際のNative C
のアセンブラ出力を確認してみると、次のようにSSE命令までは展開されていませんでした。これは、フィルターの3重forループを展開し、さらに整数加減算+シフト演算へ変換しているため、SSE命令を使うより、単純なアセンブラの実行のほうが十分高速であるからと思われます。実際、手書きで
SSE Intrinsics
で積和演算を書いて実行してみましたが、コンパイラーの最適化よりも、若干遅い結果となってしまいました。つまり、この50倍という数字は、SSE
を使わずに達成可能な数字ということになります。もう少し複雑な演算や、浮動小数点の積和が必要な処理であれば、SSEコードが生成され、50倍以上の高速化も十分可能ではないかと思います。
また、C# Paralle.For + Native
Cでは、シリアル実行に比べて2倍程度しか高速化ができていない。これは推測であるが、処理時間が0.1秒と高速になる一方、1ライン単位で
Parallel.For
によるオーバーヘッドが大きく、相対的に並列効果が少なくなったのではないだろうか。たとえば、複数ラインをまとめて処理させるなどの方法により、4コアであれば、シリアル実行の
0.2 秒の4倍速の0.05秒程度までチューニングできるのではないかと思われます。
アセンブラのコードの一部
mov DWORD PTR tv423[ebp], eax
mov eax, ebx
push edi
lea edi, DWORD PTR [ebx+ecx]
add ebx, esi
mov DWORD PTR tv463[ebp], ebx
mov ebx, esi
imul ebx, DWORD PTR _y$[ebp]
sub eax, esi
mov DWORD PTR tv441[ebp], edi
add edi, esi
mov DWORD PTR tv428[ebp], eax
add eax, ecx
mov DWORD PTR tv422[ebp], edx
add edx, esi
lea esi, DWORD PTR [edx+ebx]
mov DWORD PTR tv442[ebp], edi
add edi, ebx
add ebx, eax
add edi, ecx
おわりに
約30年前に、東北大学の大型計算機センターに NEC ACOS 1000
という当時最高速の大型計算機が導入され、修論でだいぶお世話になりました。一つのビルがこの1つのコンピュータにささげられており、さながらバベルの塔のコンピューターのような畏敬の念をいだきながら、使ったものでした。
http://museum.ipsj.or.jp/computer/main/0053.html
時は流れ、今使っているPCは、メモリも、クロックも、ストレージも、通信も、おまけにSIMD
プロセッサーに、MIMD
マルチコアプロセッサ、高解像度ディスプレイまであり、当時の世界最高速の大型計算機の性能を軽く数ケタ凌駕しています。
今回、この C# Parallel.For + Native C
による並列画像処理を調査してみて、i7 860 4コアのCPUを使って、3072 x 2304 のフルカラー画像の 3 x 3
ラプラシアン・フィルターを適用するのに、たった 0.1秒しかかからない。それでも、SSEは完全に使い余している状態です。
目の前の普通のPCが、とてつもないコンピューティングパワーを持っていることを、あらためて痛感しました。CPUのパワーに対して、ソフトウェアがまったく追いついていない状況です。このため、ソフトウェアエンジニアには、今まで以上に並列処理技術が求められるようになってくるものと思われます。
昔、並列処理プログラミングで、思わぬところでデッドロックやスレッド競合などの、思わぬバグに苦しんだことがありますが、中途半端な知識で並列処理に手は出すべきではないと思います。TPLやPLINQ
の導入で簡単に並列処理が書けるようになるぶん、並列処理に関しては十分勉強したほうが良いと思います。