 WPF
スクリーンセーバー
WPF
スクリーンセーバー
開発環境 Visual Studio 2010/.Net Framework
4.0
1.目的
WPFによるスクリーンセーバーの作り方です。
2.参考書
- いいのがないですね・・・
3.作り方
スクリーンセーバーは、昔ながらの Windows
のスクリーンセーバーの呼出し手順が使われています。このため、WPFのアプリケーションをそのままスクリーンセーバーにするには、少し修正が必要です。
ここでは、基本的な枠組みだけを作る手順を説明します。
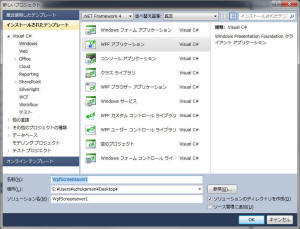
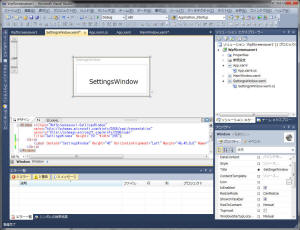
3.1 WPF 新規プロジェクトを作成
Visual Studio 2010 を立ち上げ、WPF アプリケーションの
~WpfScreensaver1~新しいプロジェクトという名前で作成します。
3.2 作り方
Windows
のスクリーンセーバーは、コントロールパネルから次のように変更することができます。この時、スクリーンセーバーのプログラムは、xyz.scr
という実行ファイルが Windows から呼び出されます。この呼び出し時のパラメータとして、/c、/p、/s
が使われます。たとえば、次のダイアログボックスの中で、設定ボタンを押した場合は、/c のパラメータが渡されます。同様に
プレニューボタンを押した場合には、/p パラメータが渡されます。それに従って、アプリケーションの動作を変更する必要があります。

そこで、App.xaml の "Startup"
を次のように変更して、パラメータに応じた動きをするように変更します。
<Application x:Class="WpfScreensaver1.App"
xmlns="http://schemas.microsoft.com/winfx/2006/xaml/presentation"
xmlns:x="http://schemas.microsoft.com/winfx/2006/xaml"
Startup="Application_Startup">
<Application.Resources>
</Application.Resources>
</Application>
App.xaml.cs は次のようになります。
using System;
using System.Collections.Generic;
using System.Windows;
using System.Globalization;
using winform = System.Windows.Forms;

namespace WpfScreensaver1
{
    /// <summary>
    /// App.xaml の相互作用ロジック
    /// </summary>
    public partial class App : Application
    {
        private void Application_Startup(object sender, StartupEventArgs e)
        {
            if (e.Args.Length > 0)
            {
                string mode = e.Args[0].ToLower(CultureInfo.InvariantCulture);

                if (mode.StartsWith("/c"))
                {
                    ShowConfiguration();
                    return;
                }
                else if (mode.StartsWith("/p"))
                {
                    ShowPreview();
                    return;
                }
            }
            ShowScreensaver();
        }

        private void ShowScreensaver()
        {
            foreach (winform.Screen scr in winform.Screen.AllScreens)
            {
                MainWindow screensaver = new MainWindow();
                screensaver.Topmost = true;
                screensaver.Left = scr.Bounds.Left;
                screensaver.Top = scr.Bounds.Top;
                screensaver.Show();
                screensaver.WindowState = System.Windows.WindowState.Maximized;
                screensaver.MouseMove += new System.Windows.Input.MouseEventHandler(screensaver_MouseMove);
            }
        }

        Point? lastMousePosition;

        void screensaver_MouseMove(object sender, System.Windows.Input.MouseEventArgs e)
        {
            Point currentMousePosition = e.MouseDevice.GetPosition(null);

            if (lastMousePosition.HasValue)
            {
                if (Math.Abs(lastMousePosition.Value.X - currentMousePosition.X) > 0 ||
                    Math.Abs(lastMousePosition.Value.Y - currentMousePosition.Y) > 0)
                {
                    Application.Current.Shutdown();
                }
            }
            else
            {
                lastMousePosition = currentMousePosition;
            }
        }

        private void ShowPreview()
        {
            Application.Current.Shutdown();
        }

        private void ShowConfiguration()
        {
            SettingsWindow settings = new SettingsWindow();
            settings.Show();
        }
    }
}
この時、System.Windows.Forms を参照に追加する必要があります。
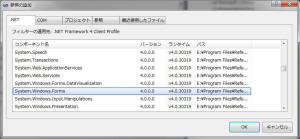
同様に、System.Drawing を参照に追加します。これは、AllScreens
で取得したスクリーンの座標を処理するために必要となります。.
これは、マルチスクリーンの場合に、スクリーンすべてをスクリーンセーバーモードにする必要があります。この際にスクリーンを列挙する際に、foreach
(winform.Screen scr in winform.Screen.AllScreens)
{
// すべてのスクリーンに対して、スクリーンセーバーを設定
}
をする際に、Screen.AllScreensメソッドを使用しています。本来であれば、Windows.Forms
を置き換えるWPFなので、このようなWindows.Forms を参照するやり方は避けたいのですが・・・AllScreens
にそうとするメソッドが WPFでは見つかりませんでした。
3.3 設定ウィンドウの追加
次に、パラメータ設定用のウィンドウを追加しましす。プロジェクト→新しい項目の追加→ウィンドウ(WPF)
により、"SettingsWindow.xaml" という名前の設定ウィンドウを追加します。
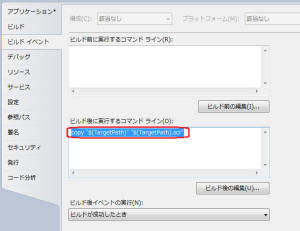
3.4 スクリーンセーバーのファイルをビルドする
スクリーンセーバーは、実行ファイルを *.scr
というエクステンションにリネームする必要があります。そこで、プロジェクト→WpfScreensaver1 のプロパティ を選択し、ビルド
イベントのビルド後に実行するコマンドラインに次のように scr エクステンションにコピーするコマンドラインを追加します。
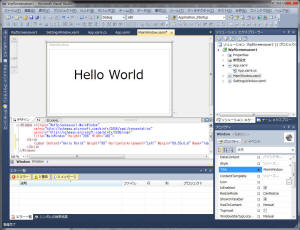
3.5 スクリーンの実装
MainWIndow.xaml を実装します。この画面がスクリーンセーバーのメイン画面となります。
たとえば、次のように Hello World を表示するようにします。
注意:
このコードだと、マルチスクリーンの場合は、同じウィンドウが3つの画面に表示されてしまいます。App.xaml.cs
のShowScreensaver()の中で、パラメータを渡してあげれば、各スクリーンで異なる処理をすることができます。
3.6 設定画面の実装
次に、SettingsWindow.xaml
を実装します。ここでは、特に設定することはないので、単に次のようなウィンドウを表示するようにします。
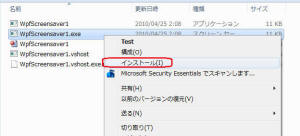
3.7 実行してみる
ここまででビルドして、実行してみましょう。エクスプローラーで、WpfScreensaver1.exe
というファイルで、種類がスクリーンセーバーというファイルができていると思います。
このファイルを右クリックするとインストールというコンテキストメニューが表示されますので、インストールを実行します。
すると、次のようにスクリーンセーバーの設定ダイアログが表示されます。
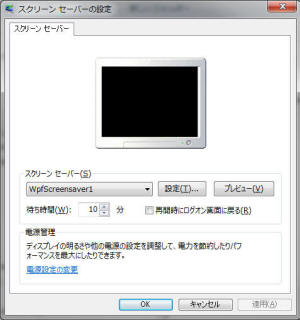
設定、およびプレビューボタンを押した際に、それぞれ
SettingsWindow.xaml、MainWindow.xaml が表示されればOKです。
4.応用編
映画 Matrix の中で出てくる緑の小さな文字が縦に流れ落ちるモニターがありましたが、あのスクリーンは仮想空間での出来事をシンボリックに表していました。最近はやりの Twitter って、あのスクリーンに似ていると思いませんか?
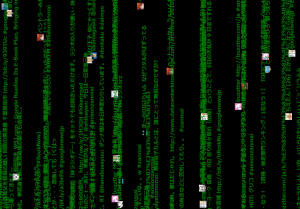
ここでは、WPFで作ってみることにしました。
4.1 基本形
基本形は3章で解説した通りのものがベースになります。この基本部分に加えて、ツイッターの情報を縦に流すためのユーザーコントロール、およびツイッターの情報を取得する部分、取得した情報を表示する部分の大きく分けて3つが必要になります。以下では、それぞれについて解説します。
4.2 ツイッターの情報を縦に流すためのユーザーコントロール TMatrixControl.xaml
ツイッターの情報を縦に流すためのユーザーコントロールに、特にデータを縦に流すためのコントロールをひとまとめにします。このユーザーコントロールを変更することにより、いろいろな表示ができるようになります。そこで、新しいプロジェクトで、WPF
ユーザーコントロールの追加します。
表示するデータは、アイコン、ユーザー名、つぶやきになりますので、これらを一列に表示するため、Stackpanel を配置し、Image,
Label, Label コントロールを配置します。
次に、文字の色、背景色、フォントサイズを app.config
から変更できるようにします。label の例では、このように Foreground と FontSize を
Properties.Settings の属性にバインドしてあげます。このバインドは、Visual Studio 2010
のバインディング エディタでは修正できないので、XAML を手書きします。
xmlns:p="clr-namespace:TMatrixControl.Properties"
<Label x:Name="labelName" Content="Label" RenderTransformOrigin="0.5,0.5" HorizontalAlignment="Left"
Foreground="{Binding Path=ForeColor, Source={x:Static p:Settings.Default}}"
FontSize="{Binding Path=FontSize, Source={x:Static p:Settings.Default}}"
次に、レイアウトルートとして、Canvas で包みます。この Canvas
に対して、スタックパネルを上から下にスクロールするようにします。スクロールするには、ストーリーボードを設定して、TranslateTransform.X
をスクリーンの上から、スクリーンの下まで、見えなくなるまでスクロールするように設定します。ここでは、500 から -2000
まで仮に設定していますが、フォントの大きさ、文字の長さによりどこまでスクロールすればよいのか変わってきますので、実際のスクロールの値は、AdjustScrollSize() で設定しています。
スクロールの開始は、このコントロールがロードされたときに開始するよう、EventTriggerを設定します。
<UserControl x:Class="TMatrixControl.VerticalFlowControl"
             xmlns="http://schemas.microsoft.com/winfx/2006/xaml/presentation"
             xmlns:x="http://schemas.microsoft.com/winfx/2006/xaml"
             xmlns:mc="http://schemas.openxmlformats.org/markup-compatibility/2006"
             xmlns:d="http://schemas.microsoft.com/expression/blend/2008"
             xmlns:p="clr-namespace:TMatrixControl.Properties"
             mc:Ignorable="d" >
    <UserControl.Resources>
        <Storyboard x:Key="OnLoaded1">
            <DoubleAnimationUsingKeyFrames RepeatBehavior="Forever" BeginTime="00:00:00" Storyboard.
         TargetName="stackPanel" Storyboard.TargetProperty="(UIElement.RenderTransform).
         (TransformGroup.Children)[3].(TranslateTransform.X)">
                <SplineDoubleKeyFrame KeyTime="00:00:00" Value="500"/>
                <SplineDoubleKeyFrame KeyTime="00:00:20" Value="-2000"/>
            </DoubleAnimationUsingKeyFrames>
        </Storyboard>
    </UserControl.Resources>
    <UserControl.Triggers>
        <EventTrigger RoutedEvent="FrameworkElement.Loaded" SourceName="stackPanel">
            <BeginStoryboard Storyboard="{StaticResource OnLoaded1}"/>
        </EventTrigger>
    </UserControl.Triggers>

    <Canvas x:Name="LayoutRoot" RenderTransformOrigin="0.5,0.5" Width="200" Height="50">
        <Canvas.RenderTransform>
            <TransformGroup>
                <ScaleTransform/>
                <SkewTransform/>
                <RotateTransform Angle="{Binding Path=Rotation, Source={x:Static p:Settings.Default}}"/>
                <TranslateTransform/>
            </TransformGroup>
        </Canvas.RenderTransform>
        <StackPanel Name="stackPanel" Orientation="Horizontal">
            <StackPanel.RenderTransform>
                <TransformGroup>
                    <ScaleTransform/>
                    <SkewTransform/>
                    <RotateTransform Angle="0"/>
                    <TranslateTransform/>
                </TransformGroup>
            </StackPanel.RenderTransform>
            <Image Height="32" Name="image1" Stretch="Fill" Width="32"  Visibility=
         "{Binding Path=ShowImage, Source={x:Static p:Settings.Default}}" />
            <Label x:Name="labelName" Content="Label" RenderTransformOrigin="0.5,0.5" HorizontalAlignment="Left"
                 Foreground="{Binding Path=ForeColor, Source={x:Static p:Settings.Default}}"
                 FontSize="{Binding Path=FontSize, Source={x:Static p:Settings.Default}}"
                   >
                <Label.RenderTransform>
                    <TransformGroup>
                        <ScaleTransform/>
                        <SkewTransform/>
                        <RotateTransform Angle="0"/>
                        <TranslateTransform/>
                    </TransformGroup>
                </Label.RenderTransform>
            </Label>

            <Label x:Name="labelTweet" Content="Label" RenderTransformOrigin="0.5,0.5" HorizontalAlignment="Left"
                 Foreground="{Binding Path=ForeColor, Source={x:Static p:Settings.Default}}"
                 FontSize="{Binding Path=FontSize, Source={x:Static p:Settings.Default}}"
                   >
            <Label.RenderTransform>
                <TransformGroup>
                    <ScaleTransform/>
                    <SkewTransform/>
                    <RotateTransform Angle="0"/>
                    <TranslateTransform/>
                </TransformGroup>
            </Label.RenderTransform>
        </Label>
        </StackPanel>
    </Canvas>

</UserControl>
4.3 ツイッターの情報を縦に流すためのユーザーコントロール TMatrixControl.xaml.cs
さらに、アイコン、ユーザー名、つぶやきを動的に設定してあげる必要があります。そこで、TMatrixControl.xaml.cs
の中で設定を行います。
VerticalFlowControl
コンストラクタの中では、アイコン、ユーザー名、つぶやき、エラー表示かどうか、表示するスクリーンの大きさをパラメータとして与えます。
SetPosition()は、どこからスクロールを開始するかを表示するスクリーンの大きさから計算します。
AdjustScrollSize()
は、どこからどこまでスクロールするか、表示するスクリーンの大きさと、ユーザー名、つぶやきの長さ、フォントサイズから計算します。
。SetFlowSpeed()
は、スクロールの速さをランダムで変更しています。これは単なる視覚効果のためだけですが、同じスピードでスクロールすると、かなり画一的で、かっこよくありません。具体的には、ストーリーボードのキータイムをある幅でランダムに変更しています。
以上で、つぶやきが上から下へ流れるユーザーコントロールができあがります。
using System;
using System.Windows;
using System.Windows.Controls;
using System.Windows.Media;
using System.Windows.Media.Animation;
using System.Windows.Media.Imaging;

namespace TMatrixControl
{
    public partial class VerticalFlowControl : UserControl
    {
        public double ScreenHeight { get; set; }
        public double ScreenWidth { get; set; }

        public VerticalFlowControl()
        {
            InitializeComponent();
        }

        public VerticalFlowControl(string label, string name, string imgUrl, int w, int h, bool highlight = false)
        {
            InitializeComponent();

            this.labelTweet.Content = label;
            this.labelName.Content = name;
            if (highlight == true)
                this.labelName.Foreground = this.labelTweet.Foreground = new SolidColorBrush(Colors.Red);
            ScreenWidth = w;
            ScreenHeight = h;
            SetPosition();

            AdjustScrollSize();
            SetFlowSpeed(30, 30);

            SetImageIcon(imgUrl);
        }

        private void SetImageIcon(string imgUrl)
        {
            if (imgUrl == null || imgUrl == "")
                return;
            this.image1.Source = new BitmapImage(new Uri(imgUrl));
        }

        private void SetPosition()
        {
            double left = rnd.Next((int)ScreenWidth) - ScreenWidth/2.0;
            Canvas.SetTop(stackPanel, left);
        }

        static System.Random rnd = new System.Random(DateTime.Now.Second);

        public void SetFlowSpeed(int min, int duration)
        {
            KeyTime kt = KeyTime.FromTimeSpan(new TimeSpan((rnd.Next(duration) + min) * 10000000));
            (((DoubleAnimationUsingKeyFrames)((TimelineGroup)this.Resources["OnLoaded1"]).
       Children[0])).KeyFrames[1].KeyTime = kt;
        }

        public void AdjustScrollSize()
        {
            double fsize = Double.Parse(Properties.Settings.Default.FontSize);
            this.FontWeight = FontWeights.ExtraBold;

            // 文字列の長さ(ドット数)= 1ポイント = 1/72 inch、1inchあたりの画素数 96 ピクセル
            int font_height = (int)(fsize * 96.0 / 72.0);
            int width_name = (int)(this.labelName.Content.ToString().Length * font_height);
            int width_tweet = (int)(this.labelTweet.Content.ToString().Length * font_height);
            int additional = 300; // Additional buffer

            this.image1.Width = this.image1.Height = font_height;

            // 画面の外(上)から
            ((((DoubleAnimationUsingKeyFrames)((TimelineGroup)this.Resources["OnLoaded1"]).
        Children[0]))).KeyFrames[0].Value = (int)ScreenHeight;
            // 文字の長さ分まで、画面の外までスクロールする。
            ((((DoubleAnimationUsingKeyFrames)((TimelineGroup)this.Resources["OnLoaded1"]).
        Children[0]))).KeyFrames[1].Value = -(width_name + width_tweet + additional);
        }
    }
}
4.4 ツイッターデータの非同期読み取りクラス TwitterClient.cs
ツイッターでは情報を取得するAPIが提供されており、非常に簡単にツイッターの情報を取得することができます。
しかし、スレッドを使わずに通信処理を行うと、ツイッターサーバーとの通信に時間がかかって処理が止まってしまうと、画面の更新が止まってしまいます。このため、ツイッターサーバーとの通信はバックグランド(スレッド)処理にする必要があります。そこで、TwitterClient
クラスを、BackgroundWorker から継承し、バックグランドで処理できるようにます。
ここでは、TwitterClient_DoWork 処理の中で、実際のツイッターサーバーからの読み込みを行うようにします。
実際のツイッターデータの読み込みは、FRIENDS_TIMELINE_URL = "http://api.twitter.com/1/statuses/home_timeline.xml"
というように、フレンドのタイムラインを取得するようにします。この時の通信は WebClient
クラスで、ユーザー名、パスワードのクレデンシャルを積んで、DownloadData() をコールします。通信が成功した場合には、かなり詳細なXMLデータが返ってきます。
この XMLデータを LINQ で必要なデータだけ列挙できるようにします。ここでは、表示に必要な、profile_image_url,
text, name と、読み込みに必要な ID だけにします。
using System.Net;
using System.Text;
using System.Linq;
using System.Xml.Linq;
using System.ComponentModel;
using System.Collections.Generic;

namespace TMScreensaver
{
    public struct Account
    {
        public string UserID { get; set; }
        public string Password { get; set; }
    }

    class TwitterClient : BackgroundWorker
    {
        //private readonly string PUBLIC_TIMELINE_URL = "http://api.twitter.com/statuses/public_timeline.xml";
        private readonly string FRIENDS_TIMELINE_URL = "http://api.twitter.com/1/statuses/home_timeline.xml";

        public Account UserAccount { get; set; }

        static long since_id = 0;

        public TwitterClient()
        {
            DoWork += new DoWorkEventHandler(TwitterClient_DoWork);
        }

        void TwitterClient_DoWork(object sender, DoWorkEventArgs e)
        {
            var client = new WebClient();

            // Set Credentials
            client.Credentials = new NetworkCredential(UserAccount.UserID, UserAccount.Password);

            // GET!
            string since_param = (since_id == 0) ? "" : "?since_id=" + since_id;
            string url = FRIENDS_TIMELINE_URL + since_param;

            var data = client.DownloadData(url);

            var xml = XElement.Parse(Encoding.UTF8.GetString(data));

            var result = from status in xml.Descendants("status")
                         select new Twitter
                         {
                             ID = long.Parse(status.Element("id").Value),
                             profile_image_url = status.Element("user").Element("profile_image_url").Value,
                             name = status.Element("user").Element("name").Value,
                             text = status.Element("text").Value
                         };

            if (result.Count() == 0)
            {
                e.Result = null;
                return;
            }
            since_id = result.Max(x => x.ID);
            e.Result = result;
        }
    }
}
4.5 ツイッターデータ格納用クラス Twitter.cs
ツイッターのデータを格納するクラスです。
namespace TMScreensaver
{
    class Twitter
    {
        public long ID { get; set; }
        public string profile_image_url { get; set; }
        public string name { get; set; }
        public string text { get; set; }
    }
}
4.6 ユーザーアカウントの処理 MainWindows.xaml.cs
ツイッターのアカウント情報(ユーザー名、パスワード)を保存しておかないと、次回またパスワードを入れないといけません。アカウント情報は、安全にストアしておく必要がありますので、ユーザー名、パスワードを暗号化して、保存します。
保存する場所は、app.config
のような場所だと、そのままファイル交換ソフトで流出してしまう可能性があるので、レジストリにストアすることにしました。
MainWindow 起動時に、LoadAccountData
を呼び出し、レジストリからユーザー名、パスワードを呼び出します。もし、初回起動時など、レジストリにエントリが存在しない場合は、SettingsWindow
を表示して、ユーザー名、パスワードを登録するようにします。
...

namespace TMScreensaver
{
    public partial class MainWindow : Window
    {
        TwitterClient twitter;
        string username = "";
        string password = "";

        public MainWindow()
        {
            InitializeComponent();

            this.Cursor = Cursors.None;

            LoadAccountData();

            twitter = new TwitterClient
            {
                UserAccount = new Account { UserID = username, Password = password }
            };

            ...
        }

        private void LoadAccountData()
        {
            SettingsWindow settingWindow = null;
            try
            {
                settingWindow = new SettingsWindow();
                settingWindow.LoadParameters();
            }
            catch (Exception)
            {
                // If the registry entry does not exist, exception may occur.
                // Then request user to enter the account data, and etc.
                settingWindow.ShowDialog();
            }
            finally
            {
                // Load Configration Data from the settingWindow.
                username = settingWindow.textBoxUsername.Text;
                password = settingWindow.passwordBox1.Password;
            }
        }
    }
}
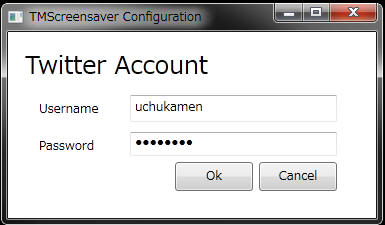
4.7 ユーザーアカウントの処理 SettingsWindow.xaml
ツイッターのアカウント情報(ユーザー名、パスワード)の設定を入力するためのウィンドウ SettingsWindow
を作成します。設定は、ユーザー名とパスワードのみとし、その他のパラメータは app.config から設定できるようにします。
理由は、ユーザーアカウントはよりセキュアに扱いたかったので、app.config
から分離したこと。また、各種設定はほとんど修正する必要はないので、あえてユーザーの目にさらさないようにしました。とはいえ、多少のカスタマイズが必要な場合は、app.config
で手で修正できるようにしました。
コードとしては、ロードする際は、レジストリから暗号化されたアカウントデータを読み込み、あるキーで復号化する。逆にセーブする際には、あるキーで暗号化し、レジストリに暗号化されたアカウントデータを格納します。
次のコードは、セキュリティのため、一部 ...secret... と伏字にしています。
using System;
using System.Windows;
using Microsoft.Win32;

namespace TMScreensaver
{
    public partial class SettingsWindow : Window
    {
        public SettingsWindow()
        {
            InitializeComponent();
        }

        private void buttonCancel_Click(object sender, RoutedEventArgs e)
        {
            Close();
        }

        private void buttonOk_Click(object sender, RoutedEventArgs e)
        {
            SavePassword();
            Close();
        }

        readonly string key = ...secret...;

        private void SavePassword()
        {
            using (RegistryKey regKey = Registry.CurrentUser.CreateSubKey(@"...secret..."))
            {
                byte[] u = Encription.Encrypt(textBoxUsername.Text, key);
                byte[] p = Encription.Encrypt(this.passwordBox1.Password, key);

                regKey.SetValue("...secret...", u);
                regKey.SetValue("...secret...", p);
            }
        }

        public void LoadParameters()
        {
            using (RegistryKey regKey = Registry.CurrentUser.OpenSubKey(@"...secret..."))
            {
                byte[] enu = (byte[])regKey.GetValue("...secret...");
                textBoxUsername.Text = Encription.Decrypt(u, key);

                byte[] enp = (byte[])regKey.GetValue("...secret...");
                passwordBox1.Password = Encription.Decrypt(p, key);
            }

        }
    }
}
4.8 MainWindow の メイン処理部分
メインウィンドウのメイン処理部分は、TwitterClient
を非同期(別スレッド)で呼び出してデータを取得し、ユーザーコントロールとして次々に表示を行っていく部分になります。
MainWindow()
のコンストラクタの処理では、カーソルの非表示、アカウントデータをレジストリから読み取り TwitterClient
にセット、TwitterClientからデータを受け取った時の RunWorkerCompleted イベントハンドラの登録を行います。
次に、実際に
MainWindowがロードされると、まずすぐにデータを取りに行きます。これは、すぐに何か表示されないと、動いていないのではないかと誤解してしまうのを防ぐためです。次に、StartReloadTimer() で、1分おきにツイッターサーバーにデータを取得しに行くようにタイマーをセットします。
タイマーが呼び出されると、twitter.RunWorkerAsync() を呼び出し、非同期で
TwitterClient の TwitterClient_DoWork()
を呼び出します。これは、メインスレッドとは別のスレッドで動作します。
TwitterClient_DoWork()
スレッドは、ツイッターのデータを受け取ると、RunWorkerCompleted イベントハンドラの
twitter_DataReceived() を呼び出します。この
twitter_DataReceived()は、メインスレッドで呼び出されます。
twitter_DataReceived() では、ツイッターから受け取ったデータは、LINQ
により列挙されて取得できますので、その1つ1つのデータから、TMatrixControl.VerticalFlowControl
のユーザーコントロールを作成し、Grid の Children に追加してあげます。
Grid にユーザーコントロールが追加され、表示されると同時に、OnLoaded
イベントトリガーにセットしてあったスクロールアニメーションが開始されます。
using System;
using System.Collections.Generic;
using System.Windows;
using System.Windows.Data;
using System.Windows.Threading;
using System.ComponentModel;
using System.Diagnostics;
using System.Windows.Input;
using System.Net;
using System.Text;
using System.Linq;
using System.Xml.Linq;

namespace TMScreensaver
{
    public partial class MainWindow : Window
    {
        TwitterClient twitter;
        string username = "";
        string password = "";

        public MainWindow()
        {
            InitializeComponent();

            this.Cursor = Cursors.None;

            LoadAccountData();

            twitter = new TwitterClient
            {
                UserAccount = new Account { UserID = username, Password = password }
            };

            twitter.RunWorkerCompleted += new RunWorkerCompletedEventHandler(twitter_DataReceived);
        }

        DispatcherTimer reloadTimer = new DispatcherTimer();

        private void Window_Loaded(object sender, RoutedEventArgs e)
        {
            twitter.RunWorkerAsync();
            StartReloadTimer();
        }

        private void StartReloadTimer()
        {
            reloadTimer.Interval = new TimeSpan(0, 1, 0);
            reloadTimer.Tick += new EventHandler(reloadTimer_Tick);
            reloadTimer.Start();
        }

        void reloadTimer_Tick(object sender, EventArgs e)
        {
            if (twitter.IsBusy)
                return;
            twitter.RunWorkerAsync();
        }

        void twitter_DataReceived(object sender, RunWorkerCompletedEventArgs e)
        {
            if (e.Error != null || e.Cancelled)
            {
                エラー処理
                return;
            }
            if (e.Result == null)
            {
                return;
            }
            foreach (var q in ((IEnumerable<Twitter>)e.Result))
            {
                TMatrixControl.VerticalFlowControl userCont1 = new TMatrixControl.VerticalFlowControl(
                    q.text, q.name, q.profile_image_url, (int)this.Width, (int)this.Height);

                if (this.grid1.Children.Count >= Properties.Settings.Default.MaxTweets)
                    this.grid1.Children.RemoveAt(0);
                this.grid1.Children.Add(userCont1);
                Debug.WriteLine(this.grid1.Children.Count);
            }
        }

        private void LoadAccountData()
        {
            前述のとおり
        }
    }
}
4.9 マルチスクリーンへの対応
最近では、1台のPCに複数のモニターを接続するマルチモニターが普通になってきました。
そのような時には、すべてのスクリーンをスクリーンセーバー対応しないと、スクリーンセーバーにならない画面が残ってしまいます。ここでは、System.WIndows.Forms.Screen.AllScreens
ですべてのスクリーン情報を取得し、メインスクリーンにツイッターの情報を表示し、残りのウィンドウはブランクスクリーンを表示するようにしています。ただし、デバッグ中は、すべてのスクリーンがブランクになってしまうと、デバッグができないため、メインウィンドウだけスクリーンセーバーにするようにしています。
エラー処理に関しては、スクリーンセーバーだと、エラーを表示する方法が限られてしまいます。エラーの出力先は、イベントビューアーでもいいのですが、不特定多数の一般ユーザーにエラー情報を送ってもらうにはイベントビューアはすこし敷居が高いです。そこで、直感的にエラー情報を送ってもらえそうなファイルにエラーを書き出すことにしました。そこで、TextWriterTraceListenerによりファイルにエラーを出力するようにしたところ、スクリーンセーバーとしてシステムから起動させたときにファイルを作成直後にプロセスが死ぬという症状に当たりました。マニュアルで起動させた場合は全く問題なく動作しているので、原因は不明です。
このため、現在はエラーコードはファイルや、イベントログには吐き出していません。ここはメンテナンスのことを考えると、何とかしたいです。
using System;
using System.Windows;
using System.Globalization;
using System.Diagnostics;
using System.IO;
using winform = System.Windows.Forms;

namespace TMScreensaver
{
    public partial class App : Application
    {
        private void Application_Startup(object sender, StartupEventArgs e)
        {
            try
            {
                if (e.Args.Length > 0)
                {
                    string mode = e.Args[0].ToLower(CultureInfo.InvariantCulture);

                    if (mode.StartsWith("/c"))
                    {
                        ShowConfiguration();
                        return;
                    }
                    else if (mode.StartsWith("/p"))
                    {
                        ShowPreview();
                        return;
                    }
                }
                ShowScreensaver();
            }
            catch (Exception exc)
            {
                Trace.WriteLine("=========================================");
                Trace.WriteLine(DateTime.Now.ToLongTimeString());
                Trace.WriteLine("App.Xaml.cs: Application_Startup");
                Trace.WriteLine(exc.Message);
                Trace.WriteLine(exc.StackTrace);
                Trace.Flush();
                Application.Current.Shutdown();
            }
        }

        private void ShowScreensaver()
        {
            foreach (winform.Screen scr in winform.Screen.AllScreens)
            {
                if (scr.Primary)
                {
                    MainWindow screensaver = new MainWindow();
                    screensaver.WindowStyle = WindowStyle.None;
                    screensaver.Topmost = true;
                    screensaver.Left = scr.Bounds.Left;
                    screensaver.Top = scr.Bounds.Top;
                    screensaver.Width = scr.Bounds.Width;
                    screensaver.Height = scr.Bounds.Height;
                    screensaver.Show();
                    screensaver.WindowState = System.Windows.WindowState.Maximized;
                    screensaver.MouseMove += new System.Windows.Input.MouseEventHandler(screensaver_MouseMove);
                    screensaver.KeyDown += new System.Windows.Input.KeyEventHandler(screensaver_KeyDown);
                }
#if (!DEBUG)
                else
                {
                    BlankWindow bw = new BlankWindow();
                    bw.Topmost = true;
                    bw.Left = scr.Bounds.Left;
                    bw.Top = scr.Bounds.Top;
                    bw.Width = scr.Bounds.Width;
                    bw.Height = scr.Bounds.Height;
                    bw.Show();
                    bw.WindowState = System.Windows.WindowState.Maximized;
                    bw.MouseMove += new System.Windows.Input.MouseEventHandler(screensaver_MouseMove);
                    bw.KeyDown += new System.Windows.Input.KeyEventHandler(screensaver_KeyDown);
                }
#endif
            }
        }

        void screensaver_KeyDown(object sender, System.Windows.Input.KeyEventArgs e)
        {
            if (e.Key == System.Windows.Input.Key.C)
            {
                SettingsWindow settingWindow = new SettingsWindow();
                settingWindow.LoadParameters();
                settingWindow.Topmost = true;
                settingWindow.ShowDialog();
            }
            else if (e.Key == System.Windows.Input.Key.E)
                Application.Current.Shutdown();
            else
                Application.Current.Shutdown();
        }

        Point? lastMousePosition;

        void screensaver_MouseMove(object sender, System.Windows.Input.MouseEventArgs e)
        {
            Point currentMousePosition = e.MouseDevice.GetPosition(null);

            if (lastMousePosition.HasValue)
            {
                if (Math.Abs(lastMousePosition.Value.X - currentMousePosition.X) > 0 ||
                    Math.Abs(lastMousePosition.Value.Y - currentMousePosition.Y) > 0)
                {
                    Application.Current.Shutdown();
                }
            }
            else
            {
                lastMousePosition = currentMousePosition;
            }
        }

        private void ShowPreview()
        {
            Application.Current.Shutdown();
        }

        private void ShowConfiguration()
        {
            SettingsWindow settings = new SettingsWindow();
            try
            {
                settings.LoadParameters();
            }
            catch
            {
                // If the entry does not exist, ask user to input account information.
                // Therefore, this erroe can be ignored.
            }
            settings.ShowDialog();
        }
    }
}
4.10 ダウンロード & フィードバック
http://cid-7cb203a44bf94940.skydrive.live.com/browse.aspx/TMScreensaver からスクリーンセーバーをダウンロードできます。
初めて WPF でスクリーンセーバーを作ったため、変な点があると思いますが、@uchukamen
#TMScreensaver でささやいてください。
5.まとめ
Visual Studio 2010
で、スクリーンセーバーのテンプレートがアップされていたのですが、マルチスクリーンに対応していなかったので、マルチスクリーン版を作ってみました。あわせて、WPF
で Matrix
のようなスクリーンセーバーを作ってみました。結構いろいろはまるところがあって、面白かったです。比較的簡単に作れますので、一度試してみてはどうでしょうか。