TMScreensaver V0.5 をアップしました。

V0.4は、スクリーンセーバーとして起動しないという致命的な問題点がありました。理由はよくわかりませんが、起動直後にエラー記録用のファイルをクリエートしたとたんに、プロセスから抜けてしまいます。T T

修正版V0.5 をアップします。修正点は、エラー記録用のファイルを作成しないようにした点と、ファイル名の変更(TMScreensaver.exe.scr → TMScreensaver.scr、TMScreensaver.exe.config→ TMScreensaver.config)です。

古いバージョンをお使いの方は、次の手順でアンインストールしてください。m_ _m

    1.解凍したフォルダーを削除
    2.レジストリの CurrentUser\Software\Uchukamen\TMScreensaver 以下を削除
    PCに格納されたデータは、これで完全に削除されます。  

[1] 名称
    TMScreensaver(x86 32bit 版)
[2] 概要
    映画 Matrix のように Twitter のタイムラインを縦に流れるように表示するスクリーンセーバー

[3] バージョン
    0.5

[4]    ダウンロード
http://cid-7cb203a44bf94940.skydrive.live.com/browse.aspx/TMScreensaver
    より、TMScreensaver.zip をダウンロードしてください。

[5] 動作環境
    .NET Framework 4.0 が動く環境
http://www.microsoft.com/downloads/details.aspx?FamilyID=9cfb2d51-5ff4-4491-b0e5-b386f32c0992&displaylang=ja
    グラフィックアクセラレータを搭載していること(CPUでの描画だと苦しいはず)

[6] インストール方法
  1.TMScreensaver.zip をダウンロードし、任意の場所(たとえばマイドキュメントフォルダーなど)で、解凍する。
    2.エクスプローラで、解凍したフォルダーを開き、TMScreensaver.scr を右クリックし、[インストール]を選択
    3.初めての場合は、TMScreensaver Configurationダイアログが表示されるので、次の情報を入力
        Username…twitter のユーザーアカウントを入力
        Password…twitter のパスワードを入力
    5.OKボタンを押すと、設定情報をレジストリに格納
    6.プレビューボタンを押し、プレビューで動作を確認
[7] アンインストール方法
    1.解凍したフォルダーを削除
    2.レジストリの CurrentUser\Software\Uchukamen\TMScreensaver 以下を削除
    PCに格納されたデータは、これで完全に削除されます   

[8] 注意制限
    1.最大タイムラインは200個
    2.通信エラー等発生した場合は、赤いメッセージを表示

[9] 各種設定
    TMScreensaver.config のXML Configurationファイルを修正する

    MaxTweets…タイムラインの同時表示数
    BackColor…背景色
    ForeColor…文字色
    FontSize…タイムラインのフォントサイズ
    Rotation…メッセージの方向(-90…上から下へ、0…左から右へ)
    ShowImage…プロファイルアイコンの表示(Visible)、非表示(Hide)

[10] 要望など
    uchukamen宛に、#TMScreensaver タグでつぶやいてください。

[11] バグ報告
    uchukamen宛に、#TMScreensaver タグでつぶやいてください。

TMScreensaver V0.4

バージョンV0.4 をリリースします。

修正点: Readme の修正、アイコンを非表示、Zip フォルダーを “TMS” から “TMScreensaver 04” に変更

WPF UserControl の app.config について

UserControl A で、app.config を設定しても、メインから呼び出される場合に値が読み込まれない。いろいろ試してみたら次のことが分かった。

UserControl A の app.config が次のようだとすると、

—————–

<?xml version="1.0" encoding="utf-8" ?>
<configuration>
    <configSections>
        <sectionGroup name="userSettings" type="System.Configuration.UserSettingsGroup, System, Version=4.0.0.0, Culture=neutral, PublicKeyToken=b77a5c561934e089" >
           <section name="TMatrixControl.Properties.Settings" type="System.Configuration.ClientSettingsSection, System, Version=4.0.0.0, Culture=neutral, PublicKeyToken=b77a5c561934e089" allowExeDefinition="MachineToLocalUser" requirePermission="false" />
        </sectionGroup>
    </configSections>
    <userSettings>
        <TMatrixControl.Properties.Settings>
            <setting name="ForeColor" serializeAs="String">
                <value>White</value>
            </setting>
        </TMatrixControl.Properties.Settings>

    </userSettings>
</configuration>

—————–

この赤の部分をメインの app.config に次のようにマージするとOK。

<?xml version="1.0" encoding="utf-8" ?>
<configuration>
    <configSections>
        <sectionGroup name="userSettings" type="System.Configuration.UserSettingsGroup, System, Version=4.0.0.0, Culture=neutral, PublicKeyToken=b77a5c561934e089" >
            <section name="TMScreensaver.Properties.Settings" type="System.Configuration.ClientSettingsSection, System, Version=4.0.0.0, Culture=neutral, PublicKeyToken=b77a5c561934e089" allowExeDefinition="MachineToLocalUser" requirePermission="false" />
          <section name="TMatrixControl.Properties.Settings" type="System.Configuration.ClientSettingsSection, System, Version=4.0.0.0, Culture=neutral, PublicKeyToken=b77a5c561934e089" allowExeDefinition="MachineToLocalUser" requirePermission="false" />
        </sectionGroup>
    </configSections>
    <userSettings>
        <TMScreensaver.Properties.Settings>
            <setting name="MaxTweets" serializeAs="String">
                <value>200</value>
            </setting>
        </TMScreensaver.Properties.Settings>

      <TMatrixControl.Properties.Settings>
        <setting name="ForeColor" serializeAs="String">
          <value>White</value>
        </setting>
      </TMatrixControl.Properties.Settings>

    </userSettings>
</configuration>

Bind の例

あまりまとまった情報がない・・・

その1 Settings.settings

<Window x:Class="WpfApplication2.MainWindow"
        xmlns="http://schemas.microsoft.com/winfx/2006/xaml/presentation"
        xmlns:x="http://schemas.microsoft.com/winfx/2006/xaml"
        xmlns:p="clr-namespace:WpfApplication2.Properties"
        Title="MainWindow" Height="350" Width="525">
    <Grid>
        <TextBox Height="77" HorizontalAlignment="Left" Margin="138,82,0,0" Name="textBox1" VerticalAlignment="Top" Width="238"
                 Text="{Binding Path=TestString1, Source={x:Static p:Settings.Default}}"
                 FontSize="{Binding Path=FontSize, Source={x:Static p:Settings.Default}}"
                 Foreground="{Binding Path=Color3, Source={x:Static p:Settings.Default}}"
                 Background="{Binding Path=Color2, Source={x:Static p:Settings.Default}}"
                 />
    </Grid>
</Window>

————————–

その2 Resources

XAML Data Binding

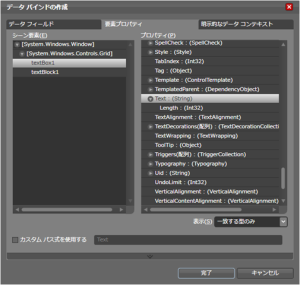
Expression Blend で TextBlockのプロパティ→共通プロパティ→ Text の右側の小さな四角をクリックimageすると、次のようなメニューが表示されるので、データバインドを選択する。imageデータバインドの作成ダイアログが表示されるので、要素プロパティタブ→シーン要素から textBox1を選択、プロパティよりTextを選択し、完了。image生成されるXAMLコード<TextBox Name=”textBox1″ VerticalAlignment=”Top” />
<TextBlock x:Name=”textBlock1″ Text=”{Binding Path=Text, ElementName=textBox1, Mode=Default}”/>Path を指定しない場合、既定でオブジェクト全体にバインドされます。Mode は、OneWay, TwoWay, OneTime, OneWayToSource, DefaultTwoWay
ソース プロパティまたはターゲット プロパティのどちらか一方が変更されると、もう一方も自動的に更新されます。この型のバインディングは、編集可能なフォームや完全対話型の UI シナリオに適しています。OneWay
バインディング ソース (ソース) の変更時にバインディング ターゲット (ターゲット) プロパティを更新します。この型のバインディングは、バインドされているコントロールが暗黙的な読み取り専用の場合に適しています。たとえば、株価情報などのソースにバインドする場合です。また、ターゲット プロパティには、データ バインドされたテーブルの背景色などの変更用コントロール インターフェイスがない可能性もあります。ターゲット プロパティの変更を監視する必要がない場合は、OneWay バインディング モードを使うことにより、TwoWay バインディング モードのオーバーヘッドを回避できます。OneTime
アプリケーションの起動時またはデータ コンテキストの変更時にバインディング ターゲットを更新します。この型のバインディングは、現在の状態のスナップショットを使用した方がよい場合や、データが完全に静的である場合に適しています。また、ソース プロパティの値を使用してターゲット プロパティを初期化するときにデータ コンテキストが事前にわからない場合にも、この型のバインディングは便利です。基本的に、この型のバインディングは、ソース値が変わらない場合にパフォーマンスを向上させる OneWay バインディングを簡易化したものです。OneWayToSource
ターゲット プロパティが変更されると、ソース プロパティを更新します。Default
バインディング ターゲットの既定の Mode 値を使用します。ただし、既定値は、各依存関係プロパティによって異なります。一般に、ユーザーが編集できる、テキスト ボックスやチェック ボックスなどのコントロール プロパティは既定で双方向のバインディングであり、それ以外のほとんどのプロパティは既定で一方向のバインドになります。依存関係プロパティが既定で一方向と双方向のいずれであるかをプログラムにより決定する 1 つの方法は、GetMetadata を使用してプロパティのプロパティ メタデータを取得してから、BindsTwoWayByDefault プロパティのブール値を確認することです。TwoWay時のソースの更新時期(UpdateSourceTrigger)は、Default, Explicit, LostFocus, PropertyChanged<TextBox Name=”textBox1″ Text=”{Binding Path=Text, ElementName=textBox2, Mode=TwoWay, UpdateSourceTrigger=Default}”/>
<TextBox Name=”textBox2″ VerticalAlignment=”Top” />

ZAM3Dが生成するXAMLをC#で実装すると ー リソースモデル

リソースモデルはこんな感じ。

WPF Morphing してみる

眼を開いた状態と目を閉じた状態の MeshGeometry3Dを、スライダーで線形合成してみた

左から右へ、眼を開いた状態、目を閉じた状態、合成したもの

眼をあいている状態では、目の周りにアイシャドウを引いていたりして、合成した時に汚くなることがある。結構細かいところに気をつける必要あり。

それから、六角大王で dxf ファイルにエクスポートした際に、頂点数が変わってしまう。このため、単純にマッピングできず、TriangleIndices でマッピングを取っている。このため、処理的にはかなり重い。動かない場所は処理しないなどの高速化が必要かもしれない。

それから、六角大王から通常状態と目を閉じた状態でエクスポートした場合、わずかに座標がずれている。このため、単純に動かない場所は処理しないという処理ができない。結構厄介だ・・・・・

namespace Morphing_V1
{
    public partial class Window1 : System.Windows.Window
    {

・・・
        GeometryModel3D gm1 = null;
        MeshGeometry3D mg10 = null;
        Point3DCollection p3dcol10 = null;

・・・

        private void slider1_ValueChanged(object sender, RoutedPropertyChangedEventArgs<double> e)
        {
            double v = this.slider1.Value / 10d;
            for (int c = 0; c < this.NormalOR32.Children.Count; c++)
            {
                gm1 = (GeometryModel3D)(this.NormalOR32.Children[c]);
                mg10 = (MeshGeometry3D)(gm1.Geometry);
                p3dcol10 = mg10.Positions;

                gm2 = (GeometryModel3D)(this.CloseEyesOR40.Children[c]);
                mg20 = (MeshGeometry3D)(gm2.Geometry);
                p3dcol20 = mg20.Positions;                gmRes = (GeometryModel3D)(this.ResOR50.Children[c]);
                mRes = (MeshGeometry3D)(gmRes.Geometry);
                poRes = mRes.Positions;                Point3DCollection resPoCol = poRes;                for (int j = 0; j < mg10.TriangleIndices.Count; j++)
                {
                    int inorm = mg10.TriangleIndices[j];
                    int ia = mg20.TriangleIndices[j];
                    resPoCol[ia] = new Point3D(
                        p3dcol10[inorm].X * v + p3dcol20[ia].X * (1.0 – v),
                        p3dcol10[inorm].Y * v + p3dcol20[ia].Y * (1.0 – v),
                        p3dcol10[inorm].Z * v + p3dcol20[ia].Z * (1.0 – v));
                }
                mRes.Positions = resPoCol;            }
        }
    }
}

頂点座標を直接変更する

スライダーで、MeshGeometry3Dの BOX の頂点座標 Positions を直接変更してみる。このぐらいの頂点数なら問題なくスムーズに変形できるが・・・・・

image

image

using System;
using System.Windows;
using System.Windows.Media;
using System.Windows.Media.Media3D;namespace Morphing_V2
{
    public partial class Window1 : System.Windows.Window
    {
        private void slider1_ValueChanged(object sender, RoutedPropertyChangedEventArgs<double> e)
        {
            double v = slider1.Value / 10f;

            GeometryModel3D gm3d = (GeometryModel3D)this.BoxOR9.Children[0];
            MeshGeometry3D mesh3d = (MeshGeometry3D)gm3d.Geometry;            for (int i = 0; i < mesh3d.Positions.Count; i++)
            {
                mesh3d.Positions[i] = new Point3D(
                   originalMeshGeometry3DPosition[i].X * v,
                   originalMeshGeometry3DPosition[i].Y * v,
                   originalMeshGeometry3DPosition[i].Z * v);
            }
        }        Point3DCollection originalMeshGeometry3DPosition = null;        private void Window_Loaded(object sender, RoutedEventArgs e)
        {
            GeometryModel3D gm3d = (GeometryModel3D)this.BoxOR9.Children[0];
            MeshGeometry3D mesh3d = (MeshGeometry3D)gm3d.Geometry;            originalMeshGeometry3DPosition = new Point3DCollection();
            for (int i = 0; i < mesh3d.Positions.Count; i++)
                originalMeshGeometry3DPosition.Add(mesh3d.Positions[i]);
        }
    }
}<Window x:Class=”Morphing_V2.Window1″ Title=”Morphing_V2″ Width=”497″ Height=”450″ xmlns=”http://schemas.microsoft.com/winfx/2006/xaml/presentation” xmlns:x=”http://schemas.microsoft.com/winfx/2006/xaml” xmlns:d=”http://schemas.microsoft.com/expression/interactivedesigner/2006″ xmlns:c=”http://schemas.openxmlformats.org/markup-compatibility/2006″ c:Ignorable=”d” Loaded=”Window_Loaded”>
    <Grid>
        <Viewport3D x:Name=”ZAM3DViewport3D” ClipToBounds=”true” Width=”400″ Height=”300″>
            <Viewport3D.Resources>
                <ResourceDictionary>
                    <MaterialGroup x:Key=”ER___Default_MaterialMR1″ >
                        <DiffuseMaterial>
                            <DiffuseMaterial.Brush>
                                <SolidColorBrush Color=”#D3C8AD” Opacity=”1.000000″/>
                            </DiffuseMaterial.Brush>
                        </DiffuseMaterial>
                        <SpecularMaterial SpecularPower=”93.8667″>
                            <SpecularMaterial.Brush>
                                <SolidColorBrush Color=”#333333″ Opacity=”1.000000″/>
                            </SpecularMaterial.Brush>
                        </SpecularMaterial>
                    </MaterialGroup>
                    <Transform3DGroup x:Key=”SceneTR7″ >
                        <TranslateTransform3D OffsetX=”0″ OffsetY=”0″ OffsetZ=”0″/>
                        <ScaleTransform3D ScaleX=”1″ ScaleY=”1″ ScaleZ=”1″/>
                        <RotateTransform3D>
                            <RotateTransform3D.Rotation>
                                <AxisAngleRotation3D Angle=”0″ Axis=”0 1 0″/>
                            </RotateTransform3D.Rotation>
                        </RotateTransform3D>
                        <TranslateTransform3D OffsetX=”0″ OffsetY=”0″ OffsetZ=”0″/>
                    </Transform3DGroup>
                    <Transform3DGroup x:Key=”BoxOR9TR8″ >
                        <TranslateTransform3D OffsetX=”0″ OffsetY=”0″ OffsetZ=”0″/>
                        <ScaleTransform3D ScaleX=”1″ ScaleY=”1″ ScaleZ=”1″/>
                        <RotateTransform3D>
                            <RotateTransform3D.Rotation>
                                <AxisAngleRotation3D Angle=”47.33348273″ Axis=”0.5325566653 -0.8245461129 -0.1910683281″/>
                            </RotateTransform3D.Rotation>
                        </RotateTransform3D>
                        <TranslateTransform3D OffsetX=”0″ OffsetY=”0″ OffsetZ=”0″/>
                    </Transform3DGroup>
                    <MeshGeometry3D x:Key=”BoxOR9GR10″
                        TriangleIndices=”0,1,2 2,3,0 4,5,6 6,7,4 8,9,10 10,11,8 12,13,14 14,15,12 16,17,18 18,19,16 20,21,22 22,23,20 ”
                        Normals=”0,0,-1 0,0,-1 0,0,-1 0,0,-1 0,0,1 0,0,1 0,0,1 0,0,1 0,-1,0 0,-1,0 0,-1,0 0,-1,0 1,0,0 1,0,0 1,0,0 1,0,0 0,1,0 0,1,0 0,1,0 0,1,0 -1,0,0 -1,0,0 -1,0,0 -1,0,0 ”
                        Positions=”-0.5,-0.5,-0.5 -0.5,0.5,-0.5 0.5,0.5,-0.5 0.5,-0.5,-0.5 -0.5,-0.5,0.5 0.5,-0.5,0.5 0.5,0.5,0.5 -0.5,0.5,0.5 -0.5,-0.5,-0.5 0.5,-0.5,-0.5 0.5,-0.5,0.5 -0.5,-0.5,0.5 0.5,-0.5,-0.5 0.5,0.5,-0.5 0.5,0.5,0.5 0.5,-0.5,0.5 0.5,0.5,-0.5 -0.5,0.5,-0.5 -0.5,0.5,0.5 0.5,0.5,0.5 -0.5,0.5,-0.5 -0.5,-0.5,-0.5 -0.5,-0.5,0.5 -0.5,0.5,0.5 ”
                    />
                </ResourceDictionary>
            </Viewport3D.Resources>            <Viewport3D.Camera>
                <PerspectiveCamera x:Name=”FrontOR6″ FarPlaneDistance=”10″ LookDirection=”0,0,-1″ UpDirection=”0,1,0″ NearPlaneDistance=”1″ Position=”0,0,2.38423″ FieldOfView=”39.5978″ />
            </Viewport3D.Camera>            <ModelVisual3D>
                <ModelVisual3D.Content>
                    <Model3DGroup x:Name=”Scene” Transform=”{DynamicResource SceneTR7}”> <!– Scene (XAML Path = ) –>
                        <AmbientLight Color=”#333333″ />
                        <DirectionalLight Color=”#FFFFFF” Direction=”-0.612372,-0.5,-0.612372″ />
                        <DirectionalLight Color=”#FFFFFF” Direction=”0.612372,-0.5,-0.612372″ />
                        <Model3DGroup x:Name=”BoxOR9″ Transform=”{DynamicResource BoxOR9TR8}”> <!– Box (XAML Path = (Viewport3D.Children)[0].(ModelVisual3D.Content).(Model3DGroup.Children)[3]) –>
                            <GeometryModel3D x:Name=”BoxOR9GR10″ Geometry=”{DynamicResource BoxOR9GR10}” Material=”{DynamicResource ER___Default_MaterialMR1}” BackMaterial=”{DynamicResource ER___Default_MaterialMR1}”/>
                        </Model3DGroup>
                    </Model3DGroup>
                </ModelVisual3D.Content>
            </ModelVisual3D>
        </Viewport3D>
        <Slider Height=”31″ HorizontalAlignment=”Left” Margin=”37.5,0,0,8″ Name=”slider1″ VerticalAlignment=”Bottom” Width=”100″ ValueChanged=”slider1_ValueChanged” />
    </Grid>
</Window>

第27回 Codeseek勉強会 プレゼン・デモ資料

2008年4月30日(水) 第27回 Codeseek勉強会で、「宇宙仮面のZAM3D で簡単3D XAML プログラミング」というタイトルで、僭越ながら講師をやらせていただきました。
ここでは、その資料、デモサンプルなどをアップします。
AGENDA
  1. 自己紹介
  2. WPF と XAML の概要
  3. Expression Blend
  4. ZAM3D とは
  5. ZAM3D と Visual Studio の連携
  6. XAML の基礎 Viewport3D
  7. アニメーションと Storyboard
  8. WPF の 3D 能力
  9. 3Dデータのインポート
  10. 回してみよう
  11. ベクトルの外積とクオータニオン
  12. 触ってみよう Hit Test
  13. おまけ 初音ミクは電気羊の夢を見るか
説明に使用した PowerPoint はこちらからどおぞ。
デモパッケージ
デモに使用したパッケージはこちらからどおぞ。
巨大(78MB)なので、ご注意ください。
また、グラフィックスアクセラレータがないと、厳しいです。
使用したなソフトウェア
  • ZAM 3D 1.0
  • Visual Studio 2008
  • 六角大王 Super 5.5
注意
このデモで使用している 3D データは下記のものを使用しています。使用条件は下記 URL より確認してください。
HONDA CRX の 3D モデリングデータ
http://www.honda.co.jp/WebPlamo/
初音ミクの 3D モデリングデータ
http://kiomodel3.sblo.jp/