WPF DisplayMemberBinding

<Window x:Class="WpfApplication3.Window1"
    xmlns="http://schemas.microsoft.com/winfx/2006/xaml/presentation"
    xmlns:x="http://schemas.microsoft.com/winfx/2006/xaml"
    xmlns:sys="clr-namespace:System;assembly=mscorlib"
    Title="Window1" Height="189" Width="459">
    <ListView>
        <ListView.View>
            <GridView>
                <GridViewColumn Width="120" Header="Date" />
                <GridViewColumn Width="120" Header="Day Of Week" DisplayMemberBinding="{Binding DayOfWeek}" />
                <GridViewColumn Width="120" Header="Year" DisplayMemberBinding="{Binding Year}" />
            </GridView>
        </ListView.View>
        <sys:DateTime>2001,1,1</sys:DateTime>
        <sys:DateTime>2010,1,1</sys:DateTime>
        <sys:DateTime>7/8/9</sys:DateTime>
        <sys:DateTime>10/11/12</sys:DateTime>
    </ListView>
</Window>

Date のところは、DisplayMemberBinding していないけど、表示されている・・・

image

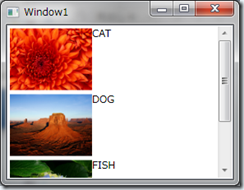
WPF ListBox で DockPanel を使った例

DockPanel を使った例

複数選択の例だけど、http://msdn.microsoft.com/ja-jp/library/ms742885(VS.80).aspx

image

<Window x:Class="WpfApplication2.Window1"
    xmlns="http://schemas.microsoft.com/winfx/2006/xaml/presentation"
    xmlns:x="http://schemas.microsoft.com/winfx/2006/xaml"
    Title="Window1" Height="226" Width="292" >
    <Grid>
        <ListBox SelectionMode="Multiple">
            <DockPanel>
                <Image Source="data\cat.jpg" Width="100" Height="80" />
                <TextBlock>CAT</TextBlock>
            </DockPanel>
            <DockPanel>
                <Image Source="data\dog.jpg" Width="100" Height="80"/>
                <TextBlock>DOG</TextBlock>
            </DockPanel>
            <DockPanel>
                <Image Source="data\fish.jpg" Width="100" Height="80"/>
                <TextBlock>FISH</TextBlock>
            </DockPanel>
        </ListBox>
    </Grid>
</Window>

WPF ListBox のバインディング

わかりにくいなぁ・・・

MSDN ListView
http://msdn.microsoft.com/ja-jp/library/ms743602(VS.80).aspx

<Window x:Class="WpfApplication2.Window1"
    xmlns="http://schemas.microsoft.com/winfx/2006/xaml/presentation"
    xmlns:x="http://schemas.microsoft.com/winfx/2006/xaml"
    xmlns:src="clr-namespace:WpfApplication1"               <<<<<< ここで、src = ネームスペース

    Title="Window1" Height="300" Width="300" >
    <Canvas>
        <Canvas.Resources>
            <ObjectDataProvider x:Key="Colors" ObjectType="{x:Type src:myColors}"/>    <<<< ここでタイプを指定
        </Canvas.Resources>
        <ListBox Name="myListBox" HorizontalAlignment="Left" SelectionMode="Extended"
      Width="265" Height="117"
      ItemsSource="{Binding Source={StaticResource Colors}}" IsSynchronizedWithCurrentItem="true">  
        </ListBox>
    </Canvas>
</Window>

/////////////////////////////////////////

using System;
using System.Collections.Generic;
using System.Linq;
using System.Text;
using System.Collections.ObjectModel;

namespace WpfApplication1
{
    public class myColors : ObservableCollection<string>
    {
        public myColors()
        {
            Add("LightBlue");
            Add("Pink");
            Add("Red");
            Add("Purple");
            Add("Blue");
            Add("Green");
        }
    }
}

WPF で ListView にデータバインドしたデータソースをアップデートしても表示が自動更新できない

単にデータバインドしていて、データソースをアップデートしただけじゃ、表示は更新してくれないのね。

Queue<Info> queue = new Queue<Info>(200);

Binding myBinding = new Binding();
myBinding.Source = queue;
myBinding.NotifyOnSourceUpdated = true;  /// <<<
BindingOperations.SetBinding(listView1, ListView.ItemsSourceProperty, myBinding);

void DataReceived(object sender, EventArgs e)
{
    foreach (var v in (IList<Info>)sender)
    {
        queue.Enqueue(v);
    }
    listView1.Items.Refresh();  /// <<<<<<<<<<<<<<<< これが必要
}

プログラムソース(C#、VB.NET)をHTMLに変換するツール

zebratchの気まぐれ日記 の [.NET]プログラムコードの変換(C#、VB.NET→HTML)[Page1] に、C#, VB.NETをHTMLに変換してくれるツールが紹介されています。

数行で変換メソッドを呼び出して、きれいな C# HTMLソースコードを生成できる。 

パスワード Triple DES

twitter client を作って遊んでいたら、パスワードを保存する必要があり、昔のメモ(2004年!) を引っ張り出して実装した。すげー、備忘録役になっているなぁ・・・=>自分。

パスワードを暗号化してレジストリに保存する

http://uchukamen.com/Programming/EncryptDecrypt/index.htm

using System.Text;
using System.Security.Cryptography;
using System.IO;

namespace Security
{
    class Encription
    {
        /// PasswordEncoder はパスワードをTriple DESでエンコード、デコードします。

        /// keyStringから TripleDESCryptoServiceProvider のKey を生成します。
        /// 注意: この生成方法を変更するとデコードできなくなります。
        ///
        private static byte[] GenerateKey(string keyString, int len)
        {
            byte[] key = new byte[len];
            for (int i = 0; i < len; i++)
                key[i] = (byte)(keyString[i % keyString.Length] + i);
            return key;
        }

        /// keyStringから tripledescryptoserviceprovider のiv を生成します。
        /// 注意: この生成方法を変更するとデコードできなくなります。
        ///
        private static byte[] GenerateIV(string keyString, int len)
        {
            byte[] iv = new byte[len];
            for (int i = 0; i < len; i++)
                iv[i] = (byte)(keyString[i % keyString.Length] – i);

            return iv;
        }

        /// パスワード文字列 password をキー key でTriple DES暗号化を行います。
        ///
        public static byte[] Encrypt(string password, string key)
        {
            // Tripe DES のサービス プロバイダを生成します
            TripleDESCryptoServiceProvider tDes = new TripleDESCryptoServiceProvider();

            tDes.Key = GenerateKey(key, tDes.Key.Length);
            tDes.IV = GenerateKey(key, tDes.IV.Length);

            // 文字列を byte 配列に変換します
            byte[] source = Encoding.Unicode.GetBytes(password);

            // 入出力用のストリームを生成します
            MemoryStream ms = new MemoryStream();
            CryptoStream cs = new CryptoStream(ms,
                tDes.CreateEncryptor(tDes.Key, tDes.IV), CryptoStreamMode.Write);

            // ストリームに暗号化するデータを書き込みます
            cs.Write(source, 0, source.Length);
            cs.Close();

            // 暗号化されたデータを byte 配列で取得します
            byte[] destination = ms.ToArray();
            ms.Close();

            return destination;
        }

        /// パスワード文字列 password をキー key でtriple des復号化を行います。
        ///
        public static string Decrypt(byte[] source, string key)
        {
            // Tripe DES のサービス プロバイダを生成します
            TripleDESCryptoServiceProvider tDes = new TripleDESCryptoServiceProvider();
            tDes.Key = GenerateKey(key, tDes.Key.Length);
            tDes.IV = GenerateKey(key, tDes.IV.Length);

            // 入出力用のストリームを生成します
            MemoryStream ms = new MemoryStream();
            CryptoStream cs = new CryptoStream(ms,
                tDes.CreateDecryptor(tDes.Key, tDes.IV), CryptoStreamMode.Write);

            // ストリームに暗号化されたデータを書き込みます
            cs.Write(source, 0, source.Length);
            cs.Close();

            // 復号化されたデータを byte 配列で取得します
            byte[] destination = ms.ToArray();
            ms.Close();

            // byte 配列を文字列に変換して表示します
            return Encoding.Unicode.GetString(destination);
        }
    }
}

DoubleAnimation の例

Opacity の変更

private void ChangeOpacity(Label label)
{  
    string name = "labelOpacity" + num++;
    this.RegisterName(name, label);

    label.RenderTransform = label.translateTransform;

    DoubleAnimation myDoubleAnimation = new DoubleAnimation();
    myDoubleAnimation.From = 1.0;
    myDoubleAnimation.To = 0.0;
    myDoubleAnimation.Duration = new Duration(TimeSpan.FromSeconds(5));
    myDoubleAnimation.AutoReverse = true;
    myDoubleAnimation.RepeatBehavior = RepeatBehavior.Forever;

    Storyboard.SetTargetName(myDoubleAnimation, name);
    Storyboard.SetTargetProperty(myDoubleAnimation, new PropertyPath(Label.OpacityProperty));

    myStoryboard1.Children.Add(myDoubleAnimation);
}

フォントサイズの変更

private void ChangeFontSize(Label label)
{
    string name = "labelFontSize" + num++;
    this.RegisterName(name, label);

    label.RenderTransform = label.translateTransform;

    DoubleAnimation myDoubleAnimation = new DoubleAnimation();
    myDoubleAnimation.From = 12.0;
    myDoubleAnimation.To = 50.0;
    myDoubleAnimation.Duration = new Duration(TimeSpan.FromSeconds(5));
    myDoubleAnimation.AutoReverse = true;
    myDoubleAnimation.RepeatBehavior = RepeatBehavior.Forever;

    Storyboard.SetTargetName(myDoubleAnimation, name);
    Storyboard.SetTargetProperty(myDoubleAnimation, new PropertyPath(Label.FontSizeProperty));

    myStoryboard1.Children.Add(myDoubleAnimation);
}

Storyboard myStoryboard1 = new Storyboard();

         ChangeOpacity(label1);
         ChangeFontSize(label1);

         myStoryboard1.Begin(label1);

Storyboard で、textBoxの TranslateTransform を変更

SetTargetPropertyあたりのプログラミングで、どのように表記すればいいのかが分からず難しい。

using System;
using System.Windows;
using System.Windows.Controls;
using System.Windows.Media;
using System.Windows.Media.Animation;

namespace wpfsbtest1
{
    /// <summary>
    /// Window1.xaml の相互作用ロジック
    /// </summary>
    public partial class Window1 : Window
    {
        public Window1()
        {
            InitializeComponent();
            Play1();
        }

        private void button1_Click(object sender, RoutedEventArgs e)
        {
            translateTransform1.BeginAnimation(TranslateTransform.XProperty, daukf);
        }

        Storyboard myStoryboard1 = new Storyboard();

        DoubleAnimationUsingKeyFrames daukf = new DoubleAnimationUsingKeyFrames();

        TranslateTransform translateTransform1 = new TranslateTransform();
        private void Play1()
        {
            textBox1.RenderTransform = translateTransform1;

            SplineDoubleKeyFrame sdkf1 = new SplineDoubleKeyFrame(0, KeyTime.FromTimeSpan(new TimeSpan(0, 0, 0)));
            SplineDoubleKeyFrame sdkf2 = new SplineDoubleKeyFrame(200, KeyTime.FromTimeSpan(new TimeSpan(0, 0, 3)));

            daukf.BeginTime = new TimeSpan(0, 0, 0);
            daukf.Duration = new TimeSpan(0, 0, 3);
            daukf.KeyFrames.Add(sdkf1);
            daukf.KeyFrames.Add(sdkf2);

            Storyboard.SetTargetName(daukf, this.textBox1.Name);
            Storyboard.SetTargetProperty(daukf, new PropertyPath(TranslateTransform.XProperty));

            myStoryboard1.Children.Add(daukf);
        }
    }
}

Storyboard で textBoxの幅を変更

using System;
using System.Windows;
using System.Windows.Controls;
using System.Windows.Media.Animation;

namespace wpfsbtest1
{
    /// <summary>
    /// Window1.xaml の相互作用ロジック
    /// </summary>
    public partial class Window1 : Window
    {
        public Window1()
        {
            InitializeComponent();
            Play1();
        }

        private void button1_Click(object sender, RoutedEventArgs e)
        {
            myStoryboard1.Begin(button1);

        }

        Storyboard myStoryboard1 = new Storyboard();
        DoubleAnimation myDoubleAnimation1 = new DoubleAnimation();

        private void Play1()
        {
            myDoubleAnimation1.From = 100;
            myDoubleAnimation1.To = 300;
            myDoubleAnimation1.Duration = new Duration(TimeSpan.FromMilliseconds(3000));

            Storyboard.SetTargetName(myDoubleAnimation1, this.textBox1.Name);
            Storyboard.SetTargetProperty(myDoubleAnimation1, new PropertyPath(TextBox.WidthProperty));

            myStoryboard1.Children.Add(myDoubleAnimation1);
        }
    }
}

Twitter Client

かずきのBlog http://blogs.wankuma.com/kazuki/archive/2008/04/24/135133.aspx に、 Twitter Client のコードが載っていた。

面白そうなので、ちょっとビルドしてみたら、簡単にデータが取れてしまった。

コードをイベントハンドラを呼び出すように少し変えたので、メモ。

using System;
using System.Collections.Generic;
using System.Net;  
using System.Text;
using System.Linq;
using System.Xml.Linq;

namespace t1
{
    public struct Account
    {
        public string UserID { get; set; }
        public string Password { get; set; }
    }

    public class TwitterStatus
    {
        public long ID { get; set; }
        public string Text { get; set; }
    }  

    class TwitterClient
    {
        private readonly string PUBLIC_TIMELINE_URL = "http://api.twitter.com/statuses/public_timeline.xml";
        private readonly string FRIENDS_TIMELINE_URL = "http://api.twitter.com/1/statuses/friends_timeline.xml";

        public Account UserAccount { get; set; }

        public void GetFriendsTimeline()
        {
            var client = new WebClient();
            // 認証情報セット  
            client.Credentials = CreateNetworkCredential();

            // GET!  
            var data = client.DownloadData(FRIENDS_TIMELINE_URL);

            var xml = XElement.Parse(Encoding.UTF8.GetString(data));

            // ID, Textを抜きだす  
            var result = from status in xml.Descendants("status")
                         select new TwitterStatus
                         {
                             ID = long.Parse(status.Element("id").Value),
                             Text = status.Element("text").Value
                         };
            DataReceived(result.ToList(), null);
        }

        public delegate void EventHandler(Object sender, EventArgs e);

        public event EventHandler DataReceived;

        private NetworkCredential CreateNetworkCredential()
        {
            return new NetworkCredential(UserAccount.UserID, UserAccount.Password);
        }
    }
}

呼び出しは、

private void button1_Click(object sender, RoutedEventArgs e)
{
    string user = ***;
    string pass = ***;

    var twitter = new TwitterClient
    {
        UserAccount = new Account { UserID = user, Password = pass }
    };

    twitter.DataReceived += new TwitterClient.EventHandler(twitter_DataReceived);
    twitter.GetFriendsTimeline();
}

void twitter_DataReceived(object sender, EventArgs e)
{
    IList<TwitterStatus> lis = (IList<TwitterStatus>)sender;

    foreach (var r in lis)
    {
   string str = string.Format("{0}:{1}", r.ID, r.Text);
   textBox1.Text += str + "\n";
    }
}

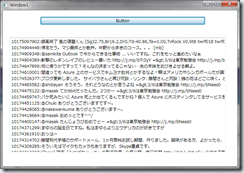
実行結果: ここまで、1時間かからないで来てしまう。
バックグラウンドワーカー入れて、タイマー入れて、文字列をあーして、こーして、あっという間にクライアントができてしまいそう。
C# 偉大すぎる。

image